Passengers don’t just care about the weather. They care about which weather.
In real airline apps, this is the screen people check before they read a delay message - usually while walking through the airport or standing in line for coffee. That moment matters, and sloppy weather context shows up fast.
Is it snowing where I’m leaving? Is it clear where I’m landing? Is this flight about to feel smooth… or bumpy?
That’s the gap we’re closing here.
We’re building a passenger-facing route weather experience for a fictional airline called SwiftAir.
If you want to follow along with the full working project, the complete SwiftAir WeatherKit demo app (including the widget) is available on GitHub:
GitHub - SwiftAir WeatherKit Demo
The repo mirrors the structure used in this post and keeps things intentionally simple so the WeatherKit and WidgetKit pieces are easy to trace.
It starts as a SwiftUI card inside a flight details screen. Then we take it one step further with a Home Screen widget that surfaces the same origin vs destination context before the app even opens.
WeatherKit does the heavy lifting. SwiftUI keeps the UI readable. And the code stays focused on the passenger.
What WeatherKit Is - and Why It Fits This Problem
WeatherKit is Apple’s native weather API.
What sold me on it wasn’t the API surface or the marketing pitch - it was the fact that it stopped me from fighting a third-party weather SDK just to render a temperature and an icon correctly. It’s backed by Apple Weather data, integrates directly with async/await, and doesn’t drag an extra weather SDK into your app.
One detail that matters for real apps: every Apple Developer account gets 500,000 WeatherKit requests per month for free. For a route card that refreshes occasionally (and caches well), that’s plenty of runway.
The bigger win is predictability. WeatherKit returns strong types, temperatures are Measurement<UnitTemperature>, and conditions come with SF Symbol names already chosen for you. That matters most in UI code, where mistakes tend to show up visually and immediately. For airline UX - where people are already stressed - boring and reliable is the best vibe.
Project Setup and Configuration
This is the part most people rush through, then circle back to when nothing works and Xcode isn’t throwing useful errors.
WeatherKit setup spans three places: the Developer Portal, Xcode capabilities, and your entitlements.
Enable WeatherKit for your App ID in the Apple Developer Portal. There are no API keys to paste. Authentication is handled through entitlements and signing.
In Xcode, add the WeatherKit capability to your target, and if you plan to use user location for anything, add Location Services as well. For this route-based design, we can lean on airport coordinates instead of GPS, which is cleaner and avoids permission prompts.
You still want a truthful Info.plist message if you ever request location:
<key>NSLocationWhenInUseUsageDescription</key>
<string>SwiftAir uses your location to show weather for your route.</string>
And your entitlements must include:
<key>com.apple.developer.weatherkit</key>
<true/>
If weather calls fail and nothing makes sense, this entitlement is often the culprit. I’ve lost more time than I care to admit chasing networking ghosts that ended up being a missing checkbox.
Understanding the WeatherKit API Surface
Everything flows through one entry point:
let service = WeatherService.shared
That simplicity is intentional, and it keeps WeatherKit from sprawling into every corner of your app.
From there you request weather for a CLLocation. You’ll primarily work with CurrentWeather, DayWeather, HourWeather, WeatherAlert, and WeatherAvailability. That last one matters because not every location has guaranteed coverage.
Attribution Isn’t Optional
Apple requires attribution anywhere WeatherKit data appears. The wording isn’t flexible. Use this exact text:
“Weather data provided by Apple Weather.”
If the UI supports interaction, link it to:
Keep it visible near the weather UI. Don’t hide it in settings.
This is one of those things App Review will absolutely flag. Missing or obscured attribution can turn into a rejection that costs you days waiting in review again, even if the rest of the app is solid.
Modeling a Flight Route
Passengers think in routes, not coordinates. So we model the route explicitly.
import CoreLocation

struct FlightRoute {
    let originName: String
    let originLocation: CLLocation
    let destinationName: String
    let destinationLocation: CLLocation
}
In a real airline app, these coordinates come from airport metadata and are stable. That stability makes caching easier and keeps the app from needing GPS.
Here’s an example route:
let denToOrd = FlightRoute(
    originName: "Denver (DEN)",
    originLocation: CLLocation(latitude: 39.8561, longitude: -104.6737),
    destinationName: "Chicago (ORD)",
    destinationLocation: CLLocation(latitude: 41.9742, longitude: -87.9073)
)
Fetching Weather Data with a Dedicated Service
Weather calls don’t belong inside SwiftUI views. Even in demos.
Beyond code cleanliness, this is also where App Review can quietly cost you time. Fetching weather directly from views often leads to repeated network calls during view updates, background refreshes, or state changes that are hard to reason about. That can show up as unexpected network activity, excessive background work, or behavior that doesn’t match what you described in App Store review notes.
Keeping weather access in a single service layer gives you one place to control caching, throttle refreshes, and clearly explain your data usage if Apple asks. It also makes it far easier to prove that you’re only requesting weather when it’s relevant, which can be the difference between a smooth review and a back-and-forth that delays a release.
I like using an actor here. Weather requests don’t need to overlap, and an actor keeps the flow predictable.
import WeatherKit
import CoreLocation

actor WeatherManager {
    private let service = WeatherService.shared

    func weather(for location: CLLocation) async throws -> (CurrentWeather, [DayWeather]) {
        let weather = try await service.weather(
            for: location,
            including: .current, .daily
        )
        return (
            weather.0,
            Array(weather.1.forecast.prefix(5))
        )
    }
}

enum WeatherError: Error {
    case unavailable
}
Coordinating Origin and Destination Requests
Now we add a view model that understands routes.
This is where the mental model shifts from “fetch some weather” to “coordinate data for a flight.” Origin and destination weather are independent of each other, so fetching them in parallel is both safe and intentional. There’s no shared state between the two requests, and no reason to make a passenger wait on one city’s weather before seeing the other.
Using parallel fetches here keeps the initial load feeling responsive, especially on slower networks, while still letting you handle failures gracefully. If one side fails, you can surface partial context instead of blocking the entire screen - which is almost always the better trade in a passenger-facing app.
@Observable
final class RouteWeatherViewModel {
    private let weatherManager = WeatherManager()

    var originWeather: (CurrentWeather, [DayWeather])?
    var destinationWeather: (CurrentWeather, [DayWeather])?
    var errorMessage: String?

    func loadWeather(for route: FlightRoute) async {
        do {
            async let origin = weatherManager.weather(for: route.originLocation)
            async let destination = weatherManager.weather(for: route.destinationLocation)
            originWeather = try await origin
            destinationWeather = try await destination
        } catch {
            errorMessage = "Weather unavailable for this route."
        }
    }
}
This is a good compromise for passenger UX. If one side fails, you can still show the other. You’re not blocking the entire screen over one missing request.
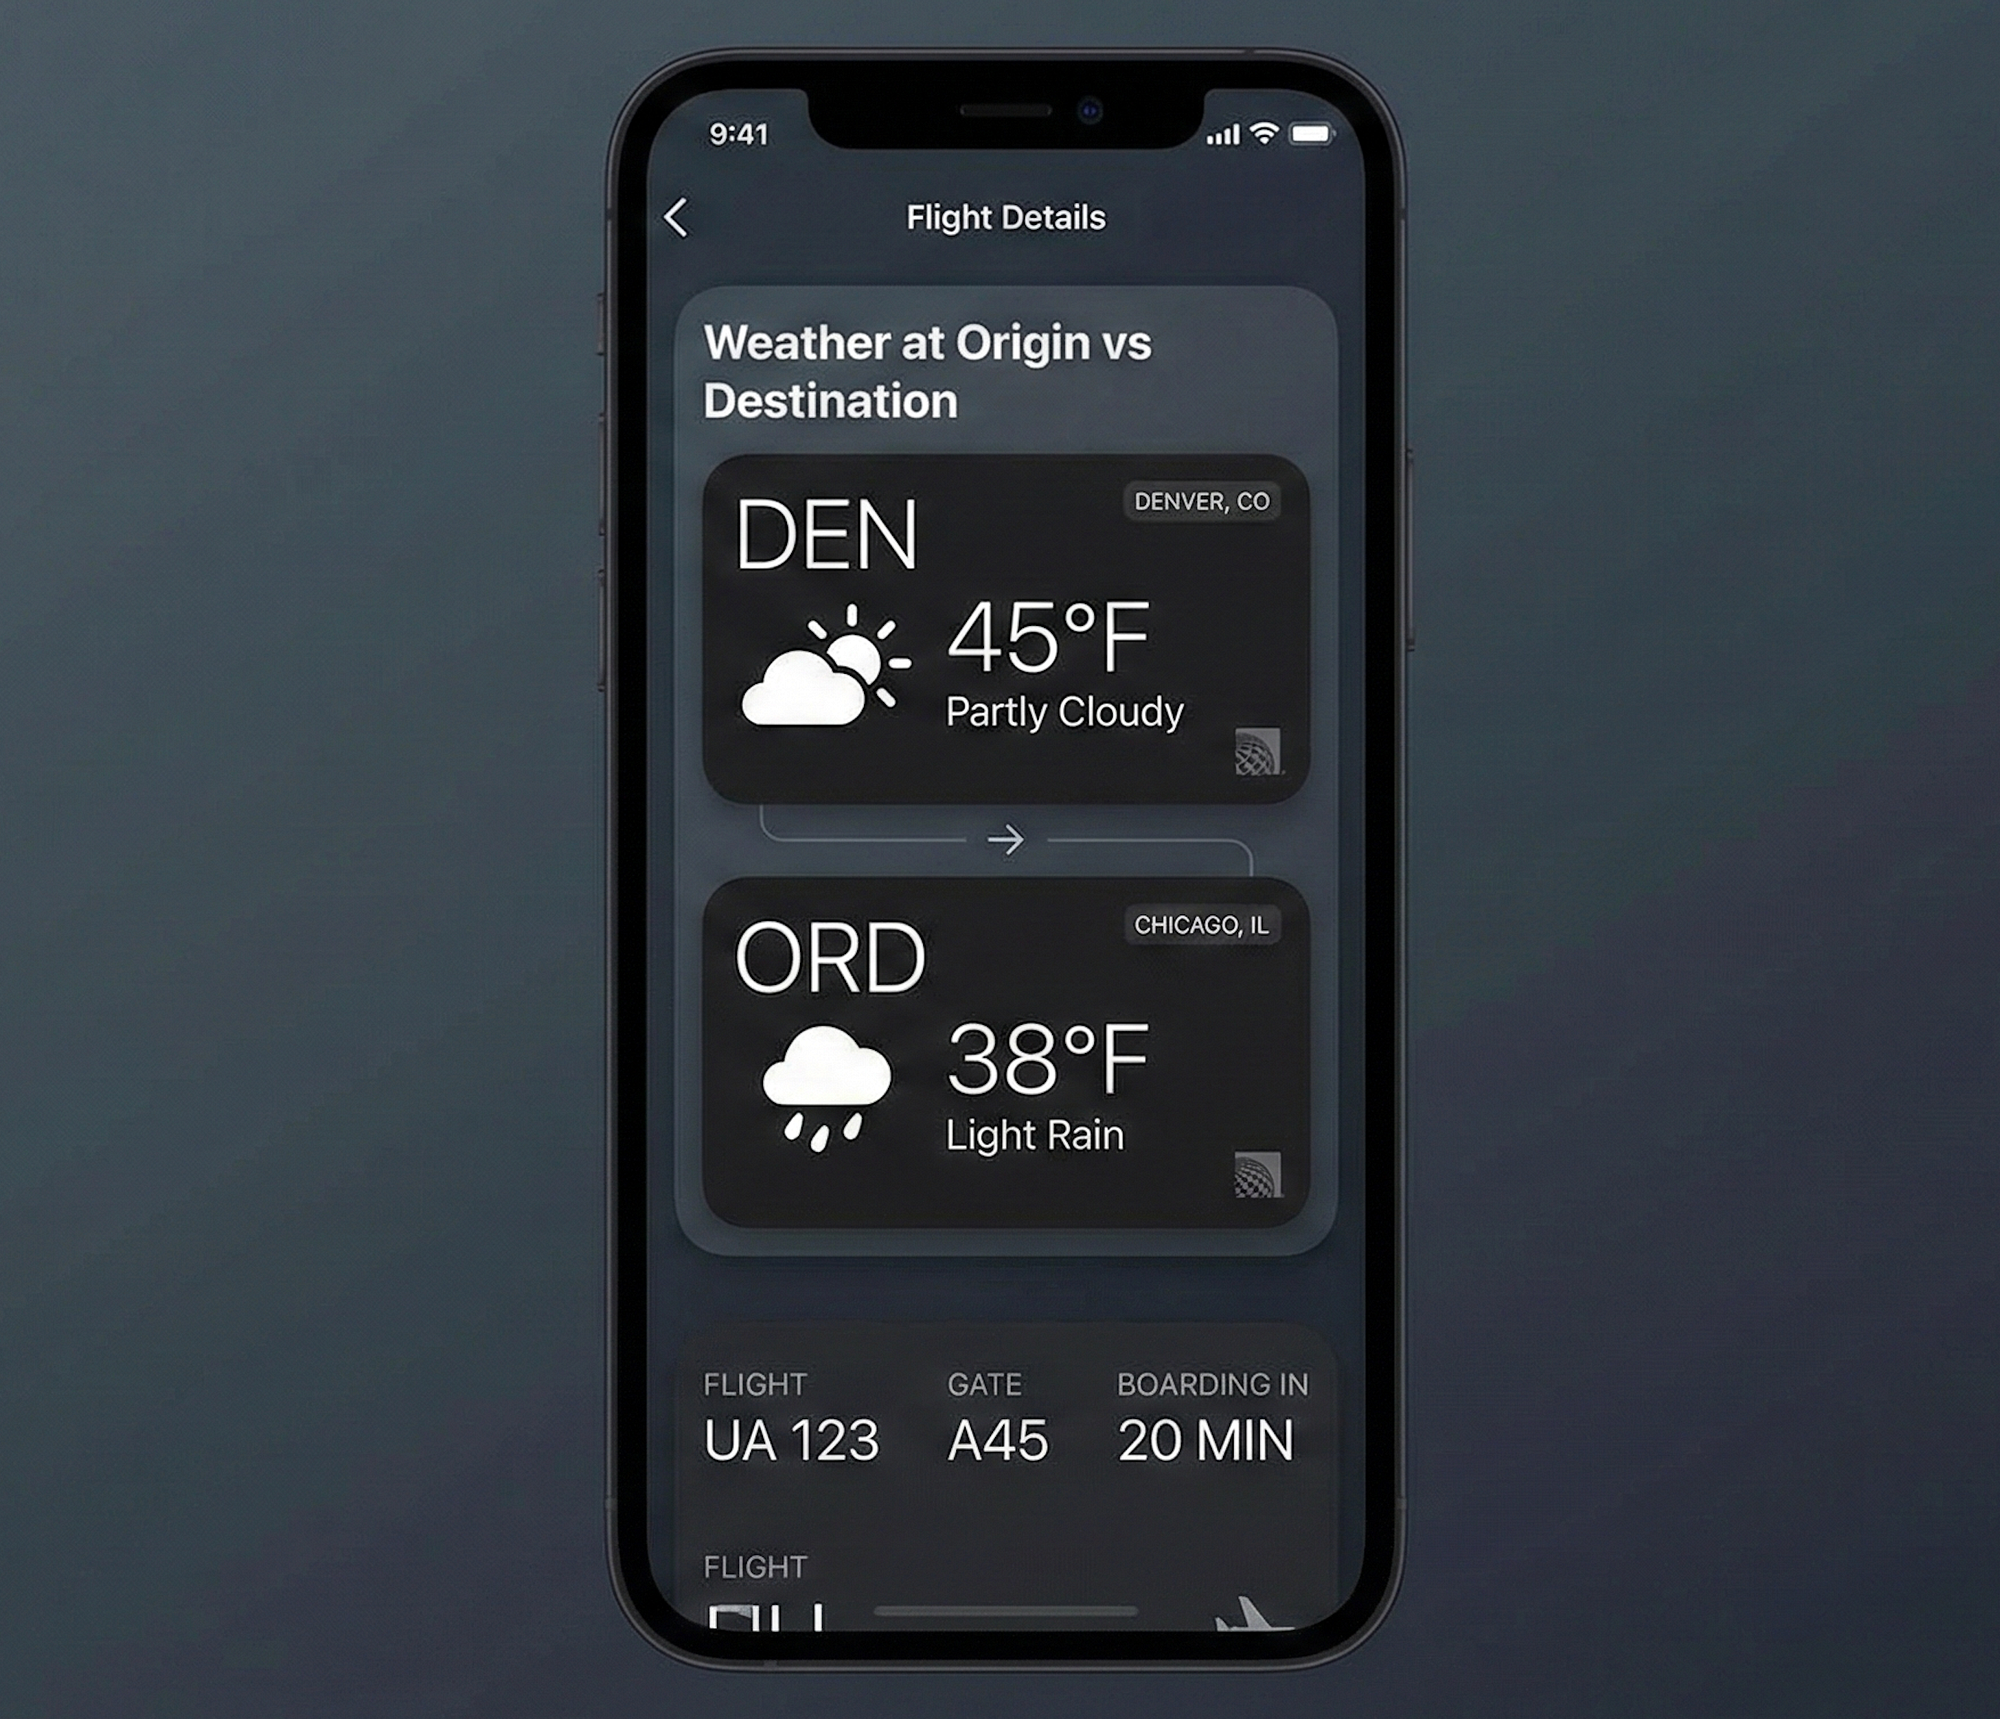
Building the Origin vs Destination Weather Card UI
The UI goal is comparison, not density. Two compact blocks that mirror each other read better than a giant forecast dump.
This matters more than it might seem. Passengers aren’t trying to analyze weather - they’re scanning for differences. Snow here, clear skies there. Calm departure, rough arrival. When the UI emphasizes contrast instead of volume, the important signal pops immediately, even at a glance.
First, a reusable city weather block:
import SwiftUI
import WeatherKit

struct CityWeatherView: View {
    let cityName: String
    let current: CurrentWeather
    let forecast: [DayWeather]

    var body: some View {
        VStack(alignment: .leading, spacing: 8) {
            Text(cityName)
                .font(.headline)
            HStack {
                Image(systemName: current.symbolName)
                Text(current.temperature.formatted())
                    .font(.title2.bold())
            }
            Text(current.condition.description)
                .font(.subheadline)
            if let today = forecast.first {
                HStack {
                    Text("H \(today.highTemperature.formatted())")
                    Text("L \(today.lowTemperature.formatted())")
                }
            }
        }
    }
}
Now the composed route card:
struct RouteWeatherCardView: View {
    let route: FlightRoute
    let originWeather: (CurrentWeather, [DayWeather])
    let destinationWeather: (CurrentWeather, [DayWeather])

    var body: some View {
        VStack(alignment: .leading, spacing: 16) {
            CityWeatherView(
                cityName: route.originName,
                current: originWeather.0,
                forecast: originWeather.1
            )
            Divider()
            CityWeatherView(
                cityName: route.destinationName,
                current: destinationWeather.0,
                forecast: destinationWeather.1
            )
            Text("Weather data provided by Apple Weather.")
                .font(.caption)
                .foregroundStyle(.secondary)
        }
        .padding()
        .background(.thinMaterial)
        .clipShape(RoundedRectangle(cornerRadius: 16))
    }
}
Notice what isn’t here: no manual icon mapping, no temperature formatter spaghetti. WeatherKit’s symbolName is already aligned with SF Symbols, and it makes the UI layer much calmer in turbulence.
Working with Weather Alerts
Alerts are separate from forecasts for a reason. Keep them separate in your UI too.
let alerts = try await WeatherService.shared.weatherAlerts(for: route.destinationLocation)
For passenger UI, the trick is restraint. Extreme alerts deserve attention. Mild advisories shouldn’t hijack the card.
Adding a Home Screen Widget for Route Weather
At some point, every airline feature gets asked the same thing: “Can this live on the Home Screen?”
For route weather, yes. A widget gives passengers the origin vs destination context before the app even opens. That’s gold when you’re heading to the airport.
Widgets don’t work like app views.
If you’ve only ever built SwiftUI inside an app target, this is where things feel different fast. There’s no view lifecycle to lean on and no room for casual refresh logic. Everything flows through a TimelineProvider, and you control refresh frequency.
Sharing the Active Route via App Group
Widgets can’t reach into your app’s memory. They run in a separate process, with a much tighter sandbox, and they only get access to what you explicitly share with them. Because of that, the widget needs its own, durable snapshot of the active route.
For this example, we store the active route in an App Group UserDefaults. This gives both the main app and the widget a shared, read-only handoff point without coupling the widget to any in-memory state or view models. It’s simple, predictable, and easy to reason about during review, which matters when you’re explaining how data flows between targets.
struct RouteSnapshot: Codable {
    let originName: String
    let originLatitude: Double
    let originLongitude: Double
    let destinationName: String
    let destinationLatitude: Double
    let destinationLongitude: Double
}
Saving from the app:
let snapshot = RouteSnapshot(
    originName: "Denver (DEN)",
    originLatitude: 39.8561,
    originLongitude: -104.6737,
    destinationName: "Chicago (ORD)",
    destinationLatitude: 41.9742,
    destinationLongitude: -87.9073
)

let data = try JSONEncoder().encode(snapshot)
UserDefaults(suiteName: "group.com.swiftair.app")?
    .set(data, forKey: "activeRoute")
The widget reads it as input and treats it as read-only.
Timeline Entry
We keep the entry light: route + current conditions for each endpoint.
import WidgetKit
import WeatherKit

struct RouteWeatherEntry: TimelineEntry {
    let date: Date
    let route: RouteSnapshot
    let originWeather: CurrentWeather?
    let destinationWeather: CurrentWeather?
}
Timeline Provider
import WidgetKit
import WeatherKit
import CoreLocation

struct RouteWeatherProvider: TimelineProvider {
    private let weatherService = WeatherService.shared

    func placeholder(in context: Context) -> RouteWeatherEntry {
        RouteWeatherEntry(
            date: Date(),
            route: sampleRoute(),
            originWeather: nil,
            destinationWeather: nil
        )
    }

    func getSnapshot(in context: Context, completion: @escaping (RouteWeatherEntry) -> Void) {
        Task {
            let entry = await loadEntry()
            completion(entry)
        }
    }

    func getTimeline(in context: Context, completion: @escaping (Timeline<RouteWeatherEntry>) -> Void) {
        Task {
            let entry = await loadEntry()
            let nextUpdate = Calendar.current
                .date(byAdding: .minute, value: 30, to: Date())!
            completion(Timeline(entries: [entry], policy: .after(nextUpdate)))
        }
    }
}
The refresh policy here is intentionally conservative. Weather doesn’t need minute-by-minute updates, and widgets are better when they’re calm.
From a technical standpoint, aggressive refresh schedules don’t buy you much accuracy, but they do increase background network usage and the chances of hitting rate limits. From an App Review standpoint, frequent updates can raise questions about why a widget needs to wake up so often, especially if that behavior isn’t clearly explained in your review notes.
A slower cadence keeps timelines predictable, battery impact low, and intent easy to justify: this widget provides situational awareness, not live weather tracking.
Loading Weather for the Widget
extension RouteWeatherProvider {

    func loadEntry() async -> RouteWeatherEntry {
        guard
            let data = UserDefaults(suiteName: "group.com.swiftair.app")?.data(forKey: "activeRoute"),
            let route = try? JSONDecoder().decode(RouteSnapshot.self, from: data)
        else {
            return RouteWeatherEntry(
                date: Date(),
                route: sampleRoute(),
                originWeather: nil,
                destinationWeather: nil
            )
        }

        let originLocation = CLLocation(
            latitude: route.originLatitude,
            longitude: route.originLongitude
        )

        let destinationLocation = CLLocation(
            latitude: route.destinationLatitude,
            longitude: route.destinationLongitude
        )
        do {
            async let origin = weatherService.weather(for: originLocation)
            async let destination = weatherService.weather(for: destinationLocation)
            let originWeather = try await origin.currentWeather
            let destinationWeather = try await destination.currentWeather
            return RouteWeatherEntry(
                date: Date(),
                route: route,
                originWeather: originWeather,
                destinationWeather: destinationWeather
            )
        } catch {
            return RouteWeatherEntry(
                date: Date(),
                route: route,
                originWeather: nil,
                destinationWeather: nil
            )
        }
    }
}
Widgets should fail quietly. When weather can’t be fetched, show placeholder UI instead of blowing up the layout.
Widget View
import SwiftUI
import WidgetKit
import WeatherKit

struct RouteWeatherWidgetView: View {
    let entry: RouteWeatherEntry

    var body: some View {
        VStack(alignment: .leading, spacing: 8) {
            CityRow(name: entry.route.originName, weather: entry.originWeather)
            CityRow(name: entry.route.destinationName, weather: entry.destinationWeather)
            Text("Weather data provided by Apple Weather.")
                .font(.caption2)
                .foregroundStyle(.secondary)
        }
        .padding()
    }
}

struct CityRow: View {
    let name: String
    let weather: CurrentWeather?

    var body: some View {
        HStack {
            Text(name)
                .font(.caption.bold())
            Spacer()
            if let weather {
                Image(systemName: weather.symbolName)
                Text(weather.temperature.formatted())
                    .font(.caption)
            } else {
                Text(" - ")
                    .font(.caption)
            }
        }
    }
}
Registering the Widget
import WidgetKit
import SwiftUI

@main
struct SwiftAirWidget: Widget {

    var body: some WidgetConfiguration {
        StaticConfiguration(
            kind: "SwiftAirRouteWeather",
            provider: RouteWeatherProvider()
        ) { entry in
            RouteWeatherWidgetView(entry: entry)
        }
        .configurationDisplayName("Route Weather")
        .description("Compare origin and destination weather at a glance.")
        .supportedFamilies([.systemSmall, .systemMedium])
    }
}
The medium family is the sweet spot for route comparisons. It gives you just enough horizontal space to show two cities, two conditions, and two temperatures without forcing visual compromises. Airport names stay readable, icons don’t feel cramped, and the comparison remains obvious at a glance.
The small family can still work, but it pushes you toward tradeoffs very quickly. City names often need truncation, temperatures lose context, and the whole widget starts to feel like a tease instead of a useful snapshot. For something as comparison-driven as route weather, medium strikes the best balance between density and clarity.
Wrapping It Up
Origin vs destination weather is one of those features that sounds small on paper, but changes how people actually use the app. It stops being a generic weather demo and starts acting like real travel context - the kind passengers check instinctively before they trust the rest of the screen.
The in-app card gives depth. The widget gives awareness. WeatherKit stays out of the way.
That’s the trade you want.
Apple’s WeatherKit docs are here if you want to keep going:
https://developer.apple.com/weatherkit/
Thanks for reading.
This is one of those features that quietly does its job. When it’s right, nobody comments. When it’s wrong, everyone notices. Weather still wins sometimes - but now at least it’s visible everywhere it should be.